

Switch from ePay Classic to our new platform
Move your webshop from ePay Classic to our new platform without interrupting customer payments.
This guide explains how to move from ePay Classic to our new platform. You create an account, configure and test the new plugin, ask us to activate live payments, and then retire Classic when you are ready.
Most of the move is self-service, so you can complete it without waiting for us. We only need to step in once: when your live account is activated and your acquiring agreements are added to it.
Your Classic account and acquiring agreements remain available during the move. You do not need to change acquiring agreement, and there is no additional cost for switching. Allow around an hour for the complete migration.
A controlled switch, without interrupting payments
Complete the steps in order and keep Classic active until the new setup has processed a live payment.
- 1Create an account on the new platformYou
- 2Install the new plugin and add your credentialsYou
- 3Place a test order and check the resultYou
- 4Activate your live account and add your acquiring agreementsePay
- 5Switch to live credentials and verify a real paymentYou
- 6Disable the Classic payment methodYou
- 7Finish the remaining Classic ordersYou
Your acquiring agreements remain active on both platforms during the switch. This means customers can continue to pay while you configure and verify our new platform.
Keep your current Classic setup running. Do not change your ePay Classic setup yet: customers must be able to pay normally while you configure our new platform.
Do not disable Classic or remove the Classic plugin. The new plugin can run alongside it, so you can install and test our new platform without affecting daily operations.
Before you start you'll need
- Administrator access to your webshop
- A current backup of your webshop
- Access to the email address used to create your account on our new platform
Create your account on our new platform
Go to app.epay.eu/register. Registration is free and does not require a payment card while you test.
- Enter your email address, company name, and webshop domain.
- Confirm your email address using the link we send you.
- Enter your full name and choose a password.
You can then sign in at app.epay.eu/login.
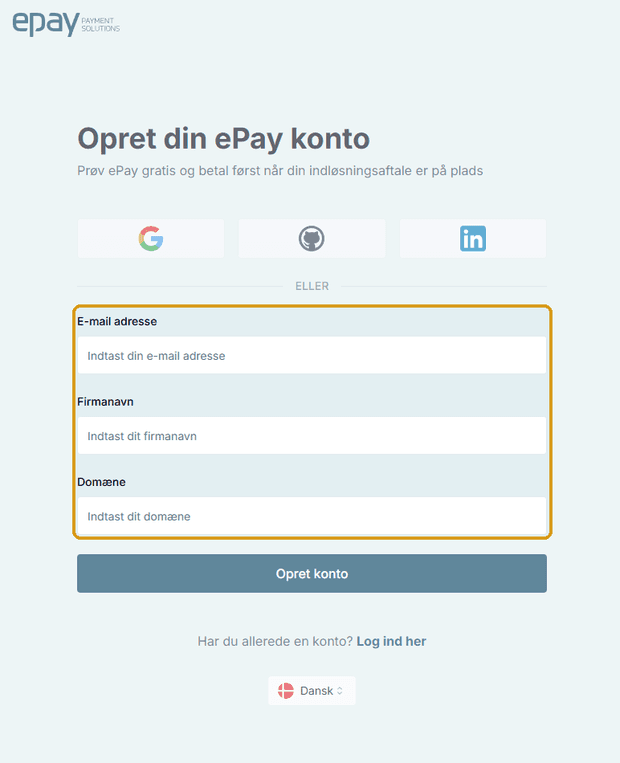
You only need to complete three fields. The Backoffice for our new platform is separate from Classic Backoffice, so you can keep both open in different tabs while you work.
Understand test and live environments
Your account starts in the test environment. Nothing needs to be activated yet.
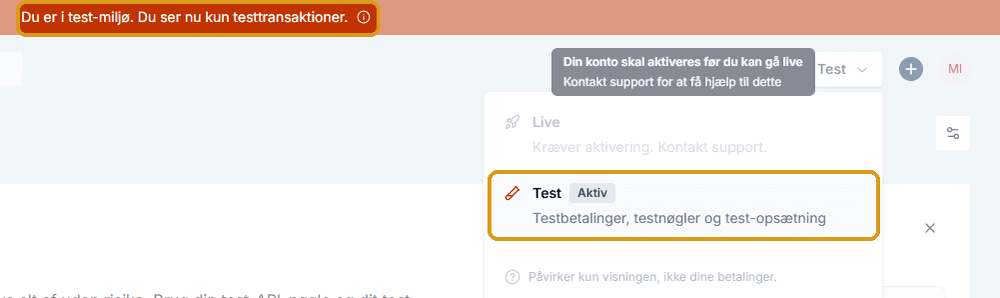
The environment selector in the top-right corner is where you will later switch from Test to Live. Test and live are separate configurations, and your account remains in Test until we activate it.
You do not just receive two API keys. You also receive two Points of Sale: one for Test and one for Live. Each Point of Sale has its own ID and webhook authorization. These are the three credentials you need for the plugin.
A Point of Sale is the store a payment belongs to. If you have one webshop, you normally have one Point of Sale in each environment. This is also where your domain and payment window are configured.
| Value | Test | Live |
|---|---|---|
| Point of Sale | Available after account creation | Created when Support activates your account |
| API key | Available after account creation | Created when Support activates your account |
| Webhook authorization | Available after account creation | Created when Support activates your account |
You do not need to create any of these values yourself. Your test credentials are ready when you create the account, and live credentials are created automatically when Support activates the live account.
Your test setup remains available after you go live. You can switch back to Test at any time to try changes without affecting real payments.
Find your credentials in Backoffice
There are three credentials to find. Two are together in the Your credentials panel on the dashboard, and the third is on the Point of Sale. Start from the dashboard.
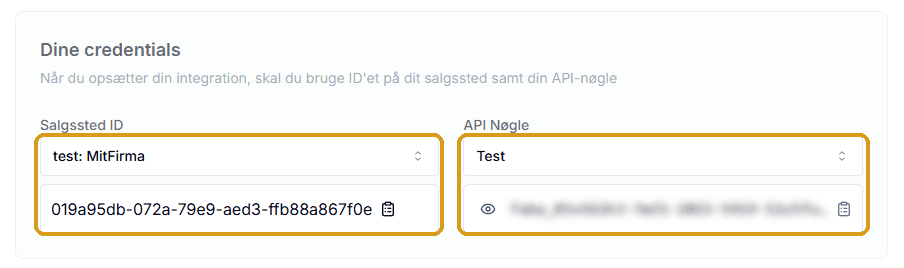
For now, just locate them. In the next step you can copy them one at a time while the plugin settings are open in another tab.
You can also find them in the menu
The API key and Point of Sale ID are also available from the left-hand menu:
| Credential | Where to find it |
|---|---|
| API key | Developers → API keys |
| Point of Sale ID | Payment → Points of Sale |
| Webhook authorization | Open the Point of Sale, then select Webhook authorization |
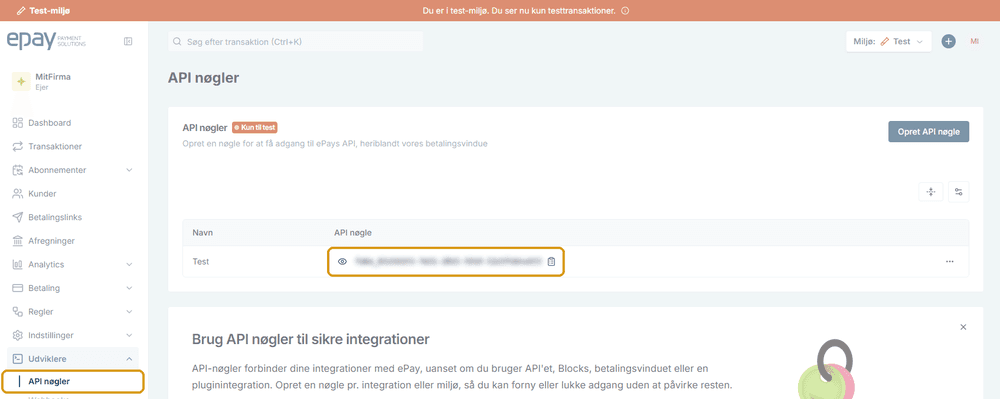
Find the API key under Developers → API keys. Select the copy icon next to the key to copy it.
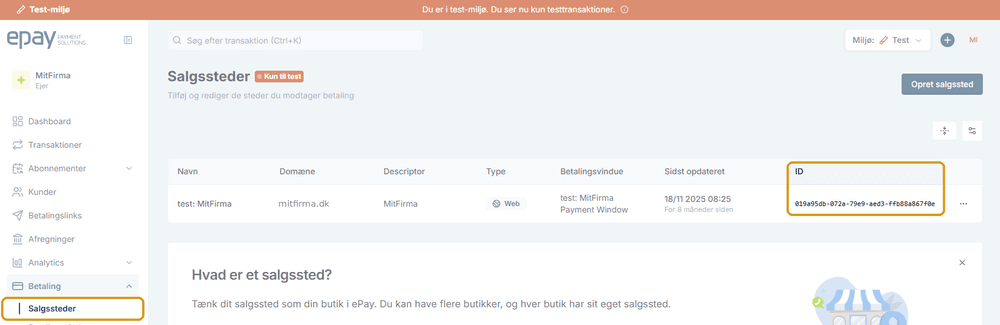
The Point of Sale ID is shown in the rightmost ID column.
Check your domain while you are here
Under Payment → Points of Sale, confirm that your webshop domain is listed in the Domain column. The domain is required for live payments; if it is missing, the payment window will not open in the live environment. This is the most common cause when the live payment window does not open.
If the domain is incorrect or was entered incorrectly during registration, contact Support and we will correct it for you.
Find the webhook authorization
After a payment is completed, ePay sends a notification to your webshop. This is what updates the order status, so you do not have to update orders manually. The notification includes an agreed secret, which lets your webshop verify that the notification came from ePay.
The secret is called Webhook authorization. It is on the Point of Sale, not on the dashboard. Open the relevant Point of Sale under Payment → Points of Sale, select Webhook authorization, then reveal and copy the full value.
Partner integrations: The Point of Sale secret described here applies when the plugin initiates payments using a merchant API key. If your integration instead initiates transactions using partner-generated merchant access tokens, use your partner notification secret for the incoming callbacks. Retrieve it from Notification secret in the Partner Portal; it is shared across merchants and test/live environments. See partner callback authentication.
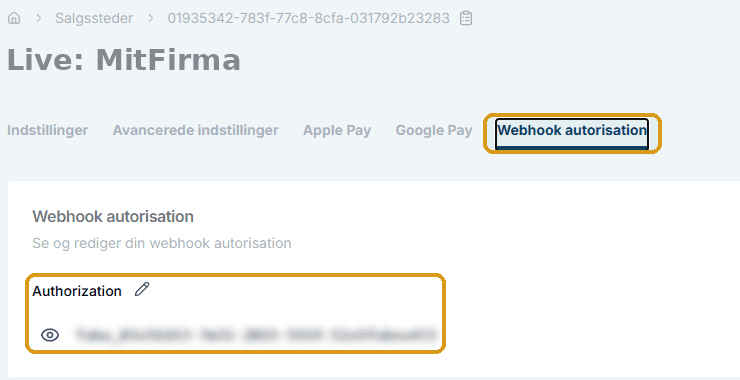
Keep your API key and webhook authorization secret. Do not expose them in browser code or share them publicly.
Install the plugin for our new platform and add test credentials
Choose your webshop platform below. Its dedicated guide covers installation in detail; when you return here, use the test API key, Point of Sale ID, and webhook authorization from the previous section.

WordPress webshop plugin

Composer-based Magento module

Hosted app for Shopify checkout

Module for PrestaShop stores

Plugin for Shopware 6

Extension for OpenCart 4
WooCommerce example
In WordPress, search for epay under Plugins and install ePay Payment Solutions.
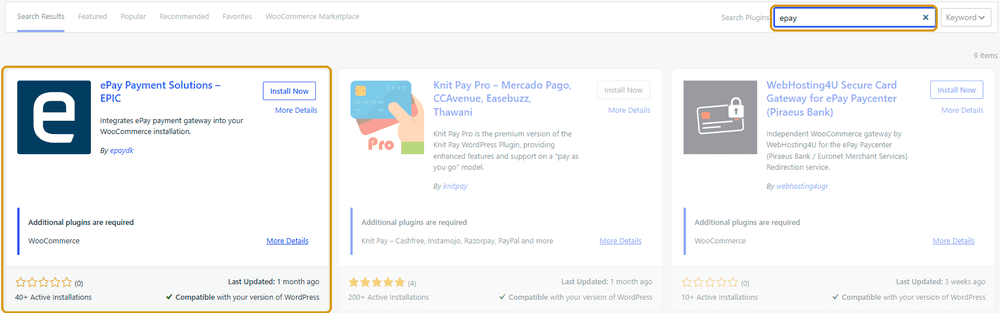
The screenshots below are from WooCommerce. Other platforms look different, but the credential fields use the same names.
Add your credentials
Keep Backoffice open in one tab and the plugin settings in another. Then complete the fields one at a time:
- Enable Activate module.
- Copy the API key from Backoffice and enter it in API Key.
- Copy the Point of Sale ID and enter it in PointOfSale ID.
- Copy the webhook authorization from the Point of Sale and enter it in Webhook Authorization.
- Save the settings.
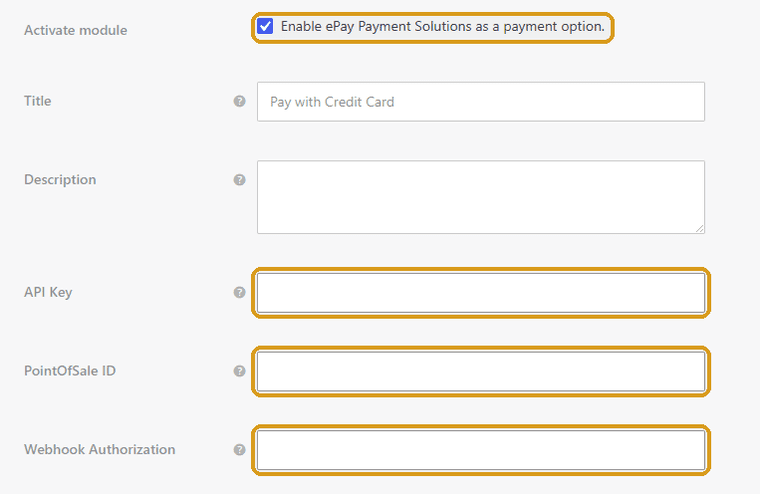
The payment title and description are displayed to customers at checkout and can be adjusted later. The webhook authorization is important: if it is empty, the webshop accepts notifications without verifying their sender. If it is incorrect, the webshop rejects the notification and the order may remain unpaid even though the customer has been charged.
Magento 2 example
In Magento, open Stores → Configuration → Sales → Payment Methods, then expand ePay Payment. Webhook Authorization is directly below PointOfSale ID, and the credentials are entered in the same order.
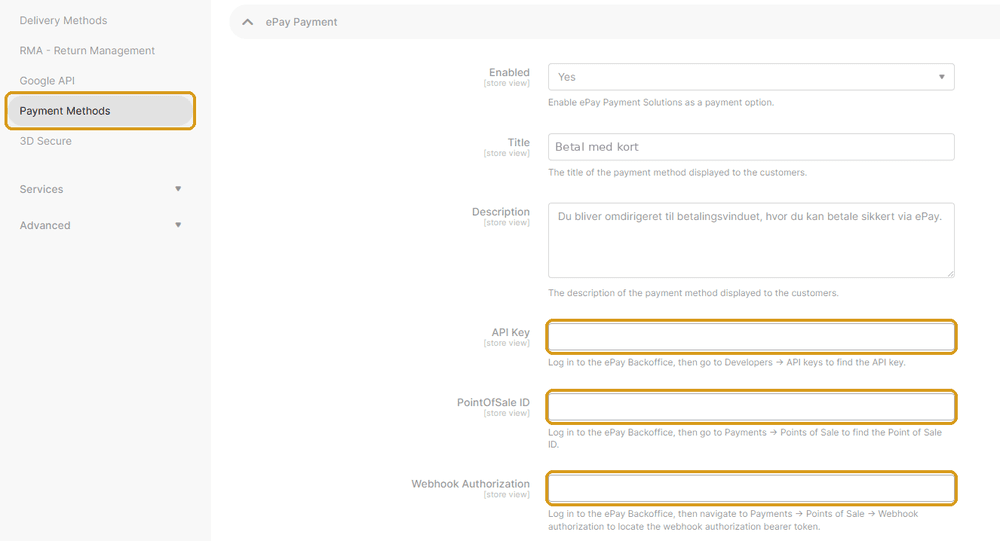
It is expected that both the Classic payment method and the payment method for our new platform are visible in your shop at this stage. Leave both enabled until our new platform has been tested.
Place a test order
Complete checkout as a customer would and select the payment method for our new platform.
Use one of these test cards; no money is charged in the test environment. Use any future expiry date and any CVC for each card.



For declined payments and 3D Secure flows, see Test cards.
After the payment, confirm that:
- The order was created
- The payment is attached to the correct order
- Payment details are visible on the order
- The transaction appears in the Backoffice for our new platform
If the payment succeeds but the order does not update, compare the plugin's webhook authorization with the value on the Point of Sale. Your webshop must also be publicly reachable so it can receive the payment result.
Ask Support to activate live payments
This is where we need to step in. Your account must be active before you can accept live payments.
Once the test order works, contact support@epay.dk or call +45 9813 9040. We will:
- activate your live account;
- add your acquiring agreements to the new account.
We will let you know when you can continue.
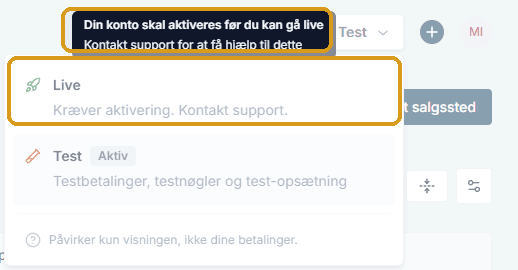
When we activate the account, your live Point of Sale, live API key, and live webhook authorization are created automatically. You do not need to create them, but you must retrieve the new credentials and update the plugin in the next step.
Replace all credentials with live values
After activation, select Live in the Backoffice for our new platform. The test banner disappears, and you now have a new set of credentials: a live Point of Sale, live API key, and live webhook authorization.
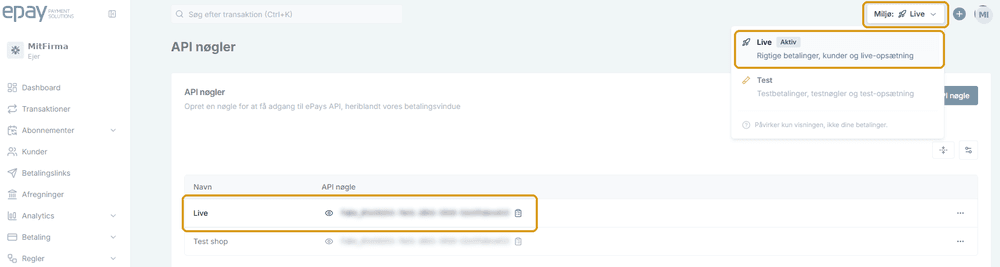
Replace all three values. A live API key with a test Point of Sale, or any other mixed combination, prevents checkout from working. It is easy to replace the key and forget the Point of Sale ID.
Retrieve the live API key from Developers → API keys; the live Point of Sale ID from Payment → Points of Sale; and the live webhook authorization from the Point of Sale itself. Then replace every value in the plugin.
Check that the live Point of Sale has the correct domain. Test and live are separate setups, so the domain does not automatically carry over. Also compare the live webhook authorization with the plugin value: if they differ, orders can remain unpaid even after the customer has been charged.
Make a real payment for a small amount with your own card and refund it afterwards. This verifies that the complete live setup works.
Disable the Classic payment method
Only after the live payment succeeds, disable the Classic payment method in your webshop. This sends new payments through our new platform.
Do not deactivate or remove the Classic plugin yet. Existing Classic orders still rely on it for captures and refunds.
Disable the Classic payment method, not the Classic plugin. Disabling the payment method stops new customers from selecting it at checkout, while keeping the plugin lets you capture and refund existing Classic orders.
Finish your remaining Classic orders
Orders paid through Classic remain on Classic. Capture or refund them as you normally would, and keep using Classic Backoffice until they are finished.
Clean up
When every Classic order has been captured or refunded, remove the Classic plugin. If you are unsure whether you have reached that point, leave it in place: an inactive plugin does no harm.
Troubleshooting
The payment method does not appear in checkout
- Confirm that the plugin is activated.
- Confirm that the payment method for our new platform is enabled in the webshop payment settings.
- Check that the API key and Point of Sale ID are complete and correct.
- Make sure every credential is from the same environment.
The payment window does not open
- Confirm that the webshop domain is registered on the selected Point of Sale.
- Confirm that the listed domain is spelled correctly and current. Contact Support if it needs to be corrected.
- Confirm that the API key and Point of Sale belong to the same environment.
- Check for theme or plugin conflicts on the checkout page.
The payment succeeds, but the order is not updated
- Confirm that the webshop can receive notifications from ePay.
- Compare the plugin's webhook authorization with the value on the Point of Sale.
- Ensure that the site is publicly available while testing; a private test server cannot receive notifications from ePay.
- Confirm that the plugin settings were saved.
Invalid credentials error
- Confirm that the full API key was copied, without a leading or trailing space.
- Confirm that each value is in the correct field: API key, Point of Sale ID, and webhook authorization.
- Do not mix test and live values. The Point of Sale ID is the value most often missed after going live.
Test works, but live does not
Select Live in Backoffice, then compare all three live credentials with the plugin. Also confirm that the correct domain is registered on the live Point of Sale.
Live cannot be selected
Your account must first be activated by ePay Support. See step 6 above.
For more help, see Troubleshooting or contact Support.
Need help?
Contact support@epay.dk or call +45 9813 9040. We can help you complete the migration.
Saved Cards in Your App with Blocks
Let authenticated users add a card to their profile and pay with it in a later in-app purchase.
Updating Payment Method for a Subscription
Merchants can update the payment method of an existing subscription by initiating a payment session and referencing the subscription ID.